Skip to content

nodebb-user-level customisation : popover element

Solved Customisation
  • hello
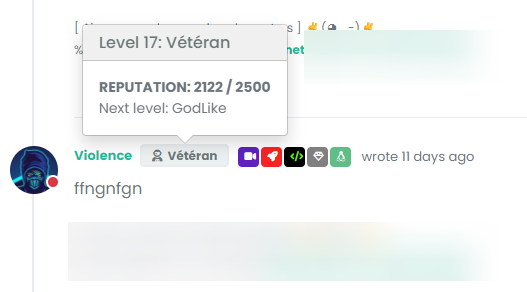
    How can I target the following CSS elements ?
    I have custom themes and I need to modify these elements because on dark theme, we have bug like here on Sudonix.

    image.png

    image.png

    @barisusakli said It’s a standard bootstrap popover so you can use the .popover class to target it.
    It has .popoover, .popover-header, .popover-body, popover-arrow classes but when I target these, I loose border and border-radius and arrow target seems to doesn’t work

    I need background boy, background title, border color, border-radius, arrow color, etc…

    Thanks in advance

  • @DownPW This isn’t as simple as it looks, because bootstrap is using inset border radius

    Here’s a workaround

    .popover-body {
        background: var(--bs-body-bg) !important;
        color: var(--bs-body-color) !important;
        border: 1px solid var(--bs-border-color);
        border-radius: 0 0 0.375rem 0.375rem;
        margin: 0px;
    }
    .popover-header {
        background-color: var(--bs-alert-info-bg);
        color: var(--bs-alert-info-color);
        border-top-left-radius: 0.375rem;
        border-top-right-radius: 0.375rem;
        margin: 0px;
    }
    .bs-popover-auto[data-popper-placement^=top]>.popover-arrow::after, .bs-popover-top>.popover-arrow::after,{
        border-top-color: var(--bs-border-color);
    }
    .bs-popover-auto[data-popper-placement^=top]>.popover-arrow::after, .bs-popover-bottom>.popover-arrow::after,{
        border-bottom-color: var(--bs-border-color);
    }
    .bs-popover-auto[data-popper-placement^=left]>.popover-arrow::after, .bs-popover-end>.popover-arrow::after {
        border-left-color: var(--bs-border-color);
    }
    .bs-popover-auto[data-popper-placement^=right]>.popover-arrow::after, .bs-popover-end>.popover-arrow::after {
        border-right-color: var(--bs-border-color);
    }
    

    Then, in the widgets section - /admin/extend/widgets select the account/profile.tpl widget, and add the below HTML

    <style>
    .popover-body {
        border-radius: 0.375rem;
    }
    </style>
    

    32d9fac7-67b1-4ea2-9aa5-37eba0ab776e-image.png

    Save the widget.

    This is the closest you can get unfortunately. It’s something of a hack, but a necessary evil.

  • Images are not seen

  • arf I can’t edit first post

    image.png

    image.png

  • @cagatay Initial post edited. Not sure why that is… 😕

  • @DownPW You mean something like this ?

    65144ee9-4220-40f9-91e8-59efc7b31828-image.png

  • exactly my friend 🙂

    same things for second screenshot

  • @DownPW This will work - obviously, modify to suit your needs

    .popover {
        border-radius: 0.375rem;
    }
    .popover-body {
        background: var(--bs-body-navbar) !important;
        color: var(--bs-body-color) !important;
        border: 1px solid var(--bs-border-color);
        border-radius: 0 0 0.375rem 0.375rem;
    }
    .popover-header {
        background-color: var(--bs-alert-info-bg);
        color: var(--bs-alert-info-color);
    }
    .bs-popover-auto[data-popper-placement^=top]>.popover-arrow::after, .bs-popover-top>.popover-arrow::after {
        border-top-color: var(--bs-border-color);
    }
    
  • @DownPW Try this

    .bs-popover-auto[data-popper-placement^=right]>.popover-arrow::after, .bs-popover-end>.popover-arrow::after {
        border-right-color: var(--bs-border-color);
    }
    

    It’s important to remember that JS will determine the popup position and then add the arrow to suit. In this case, you’d need the below CSS to capture all of them

    .bs-popover-auto[data-popper-placement^=top]>.popover-arrow::after, .bs-popover-top>.popover-arrow::after,{
        border-top-color: var(--bs-border-color);
    }
    .bs-popover-auto[data-popper-placement^=top]>.popover-arrow::after, .bs-popover-bottom>.popover-arrow::after,{
        border-bottom-color: var(--bs-border-color);
    }
    .bs-popover-auto[data-popper-placement^=left]>.popover-arrow::after, .bs-popover-end>.popover-arrow::after {
        border-left-color: var(--bs-border-color);
    }
    .bs-popover-auto[data-popper-placement^=right]>.popover-arrow::after, .bs-popover-end>.popover-arrow::after {
        border-right-color: var(--bs-border-color);
    }
    
    
  • phenomlabundefined phenomlab has marked this topic as solved on
  • better result than me but did you see this ?

    • The border radius is much larger than the original
    • On light theme, seems border was blurry

    image.png

    image.png

    • And in addition of blur, on dark/mid theme, we have 2 border with haven’t radius. Don’t know why

    image.png

    image.png

    –> I have the same behavior with my code when I have tested

  • @DownPW Ooops…

    Sorry - I forgot a class - original answer modified

    .popover {
        border-radius: 0.375rem;
    }
    
  • hmmm nope it doesn’t change anything

    see it’s worse ^^

    204f26de-7ac7-4b29-bdb3-edcb9b65a73d-image.png
    205f5e14-f3f5-4cd0-b68b-e35b2d9052b4-image.png

    –> I have the same behavior with my code last night 😞

    EDIT:

    I f you play with border-radius you better seen the bug
    There missing something

  • @DownPW This isn’t as simple as it looks, because bootstrap is using inset border radius

    Here’s a workaround

    .popover-body {
        background: var(--bs-body-bg) !important;
        color: var(--bs-body-color) !important;
        border: 1px solid var(--bs-border-color);
        border-radius: 0 0 0.375rem 0.375rem;
        margin: 0px;
    }
    .popover-header {
        background-color: var(--bs-alert-info-bg);
        color: var(--bs-alert-info-color);
        border-top-left-radius: 0.375rem;
        border-top-right-radius: 0.375rem;
        margin: 0px;
    }
    .bs-popover-auto[data-popper-placement^=top]>.popover-arrow::after, .bs-popover-top>.popover-arrow::after,{
        border-top-color: var(--bs-border-color);
    }
    .bs-popover-auto[data-popper-placement^=top]>.popover-arrow::after, .bs-popover-bottom>.popover-arrow::after,{
        border-bottom-color: var(--bs-border-color);
    }
    .bs-popover-auto[data-popper-placement^=left]>.popover-arrow::after, .bs-popover-end>.popover-arrow::after {
        border-left-color: var(--bs-border-color);
    }
    .bs-popover-auto[data-popper-placement^=right]>.popover-arrow::after, .bs-popover-end>.popover-arrow::after {
        border-right-color: var(--bs-border-color);
    }
    

    Then, in the widgets section - /admin/extend/widgets select the account/profile.tpl widget, and add the below HTML

    <style>
    .popover-body {
        border-radius: 0.375rem;
    }
    </style>
    

    32d9fac7-67b1-4ea2-9aa5-37eba0ab776e-image.png

    Save the widget.

    This is the closest you can get unfortunately. It’s something of a hack, but a necessary evil.

  • phenomlabundefined phenomlab has marked this topic as solved on
  • @phenomlab said in nodebb-user-level customisation : popover element:

    @DownPW This isn’t as simple as it looks, because bootstrap is using inset border radius

    yes, that’s what I noticed !! 😊
    Thank you baris ^^

    Hence the need to open this topic

    This hack seems to work, thanks again. If there is anything I will come back 🙂

  • @DownPW said in nodebb-user-level customisation : popover element:

    Thank you baris ^^

    Not his fault really - it’s the BS library behaviour by default.

  • No no, I said that in the sense that he told me it was simple ^^
    I was able to see that this was not the case by targeting the elements he had advised me.

  • phenomlabundefined phenomlab referenced this topic on

Did this solution help you?
Did you find the suggested solution useful? Why not buy me a coffee? It's a nice gesture, and a great way to show your appreciation 💗

Related Topics
  • 13 Votes
    30 Posts
    1k Views

    Here’s a small modification to the chatBanner function that will place the message just above the composer/reply component meaning it is pinned at the bottom and always in view as a reminder. I’ve made this change to support the threadedChat I’m currently developing

    // Chat message banner function chatBanner() { var roomName = $("h5[component='chat/header/title']").text().trim(); var bannerContent; if (roomName === "Testing 3") { bannerContent = '<div id="chatbanner">This message will fire for chat rooms with the title of "Testing 3"</div>'; } else { bannerContent = '<div id="chatbanner">This session is for <strong>private discussion only</strong> between the chosen participants. Please do <strong>not</strong> place support requests here and create a <a href="#" onclick="app.newTopic();">new topic</a> instead.</div>'; } var chatMessagesContainer = $('[component="chat/system-message"]:last-of-type'); //var existingMessages = $('[component="chat/message"]'); var existingMessages = $('[component="chat/composer"]'); if (existingMessages.length === 0) { // If there are no messages, append the banner to the messages container chatMessagesContainer.first().after(bannerContent); } else { // If there are messages, add the banner after the last message // existingMessages.last().after(bannerContent); existingMessages.before(bannerContent); } }
    There are only two changes here:

    var existingMessages = $('[component="chat/message"]');

    becomes

    var existingMessages = $('[component="chat/composer"]');

    and

    existingMessages.last().after(bannerContent);

    becomes

    existingMessages.before(bannerContent);
  • 0 Votes
    2 Posts
    462 Views

    @mventures said in NodeBB: Consent policy popup:

    How did you implement this consent pop-up?

    This is located in /admin/settings/cookies

    @mventures said in NodeBB: Consent policy popup:

    Does it appear every new day for a user who has accepted it?

    No. It places a cookie on the machine of the user who visits the site, and once they accept it, it doesn’t appear again unless you select

    0bda6e07-efca-4039-a132-c94060a6fec4-image.png

  • 0 Votes
    4 Posts
    536 Views

    @cagatay You’d target the body tag and use the below line of CSS

    background: url(/assets/customcss/backgrounds/default/default.png) no-repeat center center fixed;

    Obviously, you need to change the path to suit where your image is being stored.

    More info around the background property can be found here

    https://www.w3schools.com/cssref/css3_pr_background.php

  • Error install plugin

    Solved Customisation
    8
    1 Votes
    8 Posts
    468 Views

    @pobojmoks

    Not WP plugin but nodeBB but it a known bug

  • New message CSS problem

    Unsolved Customisation
    11
    2 Votes
    11 Posts
    571 Views

    @DownPW hi. Sorry for digging up an old post, but I’m going through items still unresolved and was looking to get an understanding of where you are currently with this?

  • 0 Votes
    9 Posts
    814 Views

    @downpw I’m inclined to agree with this. There isn’t much else you can do, and provided it works with no odd looking artefacts in other browsers, then ok. The :before and :after are pseudo classes and very well supported across all browsers (except perhaps Internet Exploder, but who uses that these days ?)

  • 7 Votes
    25 Posts
    2k Views

    @phenomlab okay

  • nodebb-plugin-customize error

    Solved Customisation
    25
    2 Votes
    25 Posts
    2k Views

    @phenomlab it work, thanks 🙂